Aftermarket 4x4 Parts and Accessories
Expedition & Overland Preparation
Outdoor, Camping & Bushcraft Products


Categories Disco USB Ashtray
Disco USB Ashtray
Locate all the parts you need for assembly
Bag parts:
- Plastic face panel
- 2x USB modules
- 2x Screw
- Wire
Tools required
- Knife
- Wirestrippers
- 2.5mm Allen Key
- Ruler
- Small flatblade screwdriver

Find one of the screws and one of the USB modules

Snap the module into place

Add the screw to the location hole

Tighten the screw down just snug. Don't risk overtightening it and damaging the threads

Insert the second module and screw.
Take your time here, it's gonna be awkward,
You are going to be turning in that screw for what seems like for ever...
...maybe kick back with your favourite music track and come back here when you're finished.


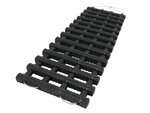
You should now be looking at two secure modules.

Onto the next bit.....
![]()
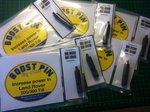
Wiring the Modules:
First we will prepare the cable.
Your Fourby USBs' come with an automotive grade 2 core thinwall cable
Grab your ruler and measure out 20CM (200mm) of cable. Be as accurate as you can if you want a nice tidy job, we've done the maths so you dont have to...


We need to strip back 20mm of the black outer sheath from each end of the wire.
(Be careful here to only strip the outer sheathing and not to damage the inner cores or their insulation)
Take your time to do it right...


Next we'll strip the insulation back on each of the cores.
Measure 5mm and strip back the insulation on all of the cores at each end.


Pinch the core and twist all the copper strands together

Twist all 4 ends

You have prepared the cable... Nice one.
On to the next bit.....
![]()
Next we'll put the wire we just prepared into the USB terminals
Look for this little block

Start with the module the furthest away from the block

Wire the module, observing the polarity:
Red wire next to the jack plug hole
Black wire onto the second terminal.

Lock down the wires into the terminals using your screwdriver.

Pay attention to the details in the next bit...
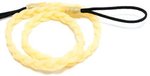
Pinch the wire as shown below and put a 180degree twist in it

it should twist once like this

Grip at the twist and pull the wire straight


Wire in the terminals on the other module to create this nice loop
Red wire next to the jack plug hole
Black wire onto the second terminal.

Hold the unit like this with your thumb


Grab the cable at the middle of the loop with the other hand

Fold it down and tuck it under your thumb

Now roll the cable into position just inside the unit and press into place into the retainiers


Good Job!


Well done
Onto the next bit...
![]()
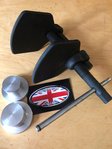
Next we will wire the main power feed.
Using the same rules as before, strip the wire back
20mm of sheath
5mm of core insulation.

This time we look for the module closest to the little block
and wire the cable in tandem with the other

Make sure you get the wires in the correct terminals
Red to Red
Black to Black

Fold the cable over the back of the module and into the strain relief block

Add the cable tie and nip it up.

Cut the tail off the cable tie

Well done, you have completed the build of your USB Sockets
Its Haribo Time..!


You are all done
go and install into your car.
![]()
You maybe wondering what the circle is on the back?
This is an option for you
if you want to add a ciggarette lighter socket here, we have provided a pilot for you to drill
use a step drill in a drill press on a slow/medium speed


")